When your letter has ink going all the way to the edge of the page, without the typical white border, it's referred to as "full-bleed" printing.
Letters with full-bleed printing look more professional and stand out, since this type of printing typically can't be done on most home printers or office photocopiers.
How does it work?
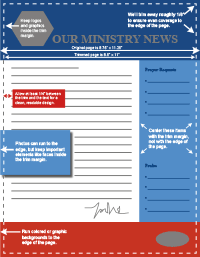
For a normal letter-sized document, we print two copies on a larger, 12x18" sheet and then cut them down to size. (We could just as easily print one copy on a 9x12" sheet.)
Since the printing and cutting isn't completely precise, we ask you to include a 1/8" bleed around each edge. To do this, you make your page size a little bigger, and extend photos and background elements all the way to the edge of the enlarged sheet.
When we then cut your letters, there won't be a white margin around the edges even if the cut is off by a smidge.
What does it cost?
Full-bleed printing adds $0.50 per finished sheet (single-sided or double-sided) for printing, and $8.00/order for cutting.
To include this service, just mention it in the special instructions box when you send us your letter.
How do I format my letter?
Adobe InDesign

If you're using InDesign, you have it easy. Set up a 0.125" bleed around each edge, and InDesign will show you both the edge of the page and the bleed area.
For anything that you want touching the edge of the sheet, extend it all the way to the bleed line (the red line just outside the page boundary). Everything else should stay at least 1/8" (preferably more) from the edge of the page.
When you export a PDF from InDesign to send to us, go to the "Marks and Bleeds" section, ensure that "Use Document Bleed Settings" is checked, and leave everything else unchecked.
Please don't include any crop marks or printer marks in the PDF.
Other Software: Method 1 (Set the Page Size)

Page Size in Word
Most other programs don't have built-in support for full-bleed printing, but you can get it to work by changing your paper size.
For a regular letter, set your page size as follows:
Width: 8.75"
Height: 11.25"
This gives you an extra 1/8" around each edge of the page. For anything that you want at the edge of the page, bring it to the edge of the new page size, and ensure that it's okay to cut off roughly 1/8" around the edges.
You can then optionally set your margins to be 0.375" on each side. Anything that doesn't go all the way to the edge should stay inside these margins, for best results.
If you're sending us a PDF file, please check the page size after you create the PDF – many PDF programs will automatically convert to letter-sized paper unless you set a custom paper size. You can check this in Adobe Reader by clicking on the File menu, and choosing Properties.
Other Software: Method 2 (Scaling)
If you want to have full-bleed printing but don't want to go through the trouble of setting page sizes, we can enlarge your document just a little (roughly 3%) when we print it, and then trim off the edges, giving you the same effect.
If you go with this option, make sure that there aren't any important details within 0.5" of each edge of the page.
Then, just send us the original file or a PDF normally, and we'll take care of the rest for you.